Withdraw tokens to parent chain
This guide shows you how to withdraw ERC-20 tokens from an Arbitrum child chain back to a parent chain (like Ethereum). This assumes your token is already configured for bridging. If you need to set up bridging for a new token, see Configure token bridging.
Prerequisites
- Your token must already be bridgeable (registered with a gateway)
- A wallet with tokens on the child chain
- ETH on both chains (child chain for initiation, parent chain for final execution)
- Important: Withdrawals require ~7 days to finalize due to the challenge period
- Familiarity with child-to-parent messaging
Withdrawing tokens using the Arbitrum SDK
The simplest way to withdraw tokens is using the Arbitrum SDK:
Step 1: Initiate withdrawal on child chain
import { getArbitrumNetwork, Erc20Bridger } from '@arbitrum/sdk';
import { providers, Wallet } from 'ethers';

// Set up providers and wallet
const parentProvider = new providers.JsonRpcProvider(process.env.PARENT_RPC);
const childProvider = new providers.JsonRpcProvider(process.env.CHILD_RPC);
const childWallet = new Wallet(process.env.PRIVATE_KEY, childProvider);

// Initialize the bridge
const childNetwork = await getArbitrumNetwork(childProvider);
const erc20Bridge = new Erc20Bridger(childNetwork);

// Initiate withdrawal
const withdrawTx = await erc20Bridge.withdraw({
  amount: ethers.utils.parseUnits('100', 18),
  erc20ParentAddress: parentTokenAddress,
  childSigner: childWallet,
});

const withdrawReceipt = await withdrawTx.wait();
console.log(`Withdrawal initiated: ${withdrawReceipt.transactionHash}`);
Step 2: Wait for the challenge period (~7 days)
import { L2ToL1MessageStatus } from '@arbitrum/sdk';

// Get the withdrawal message
const childReceipt = new L2TransactionReceipt(withdrawReceipt);
const messages = await childReceipt.getL2ToL1Messages(childWallet);
const message = messages[0];

// Wait for the message to be confirmed (takes ~7 days)
await message.waitUntilReadyToExecute(childProvider);
console.log('Message confirmed! Ready to execute on parent chain.');
Step 3: Execute on parent chain
// Execute the withdrawal on the parent chain
const parentWallet = new Wallet(process.env.PRIVATE_KEY, parentProvider);
const executeResult = await message.execute(childProvider);
await executeResult.wait();

console.log('Withdrawal complete!');
console.log(`Parent chain transaction: ${executeResult.transactionHash}`);
Withdrawing tokens manually
If you prefer to interact with the contracts directly:
Step 1: Initiate withdrawal on child chain
Approve and call the L2GatewayRouter:
// Approve the L2 gateway
const childToken = new ethers.Contract(childTokenAddress, erc20ABI, childWallet);
const childRouter = new ethers.Contract(childRouterAddress, routerABI, childWallet);

// Get the gateway address
const gateway = await childRouter.getGateway(parentTokenAddress);

// Approve
await childToken.approve(gateway, amountToWithdraw);

// Initiate withdrawal
const withdrawTx = await childRouter.outboundTransfer(
  parentTokenAddress, // Parent chain token address
  parentDestination, // Where to send tokens on parent chain
  amountToWithdraw,
  '0x', // Extra data (usually empty)
);

await withdrawTx.wait();
Step 2: Wait for challenge period
After initiating the withdrawal, you must wait approximately 7 days for the assertion containing your withdrawal to be confirmed.
You can check the status on the Arbitrum Bridge UI by connecting your wallet, or programmatically track the message status.
Step 3: Construct proof and execute on parent chain
After the challenge period, get the proof data using NodeInterface:
const nodeInterface = new ethers.Contract(
  '0x00000000000000000000000000000000000000C8',
  nodeInterfaceABI,
  childProvider,
);

// Get proof data (you'll need the batch number and index from the withdrawal receipt)
const proofData = await nodeInterface.constructOutboxProof(batchNumber, indexInBatch);
Then execute on the parent chain using the Outbox contract:
const outbox = new ethers.Contract(outboxAddress, outboxABI, parentWallet);

const executeTx = await outbox.executeTransaction(
  proofData.proof,
  proofData.path,
  proofData.l2Sender,
  proofData.l1Dest,
  proofData.l2Block,
  proofData.l1Block,
  proofData.timestamp,
  proofData.amount,
  proofData.calldataForL1,
);

await executeTx.wait();
console.log('Withdrawal executed on parent chain!');
How withdrawals work
The token withdrawal process:
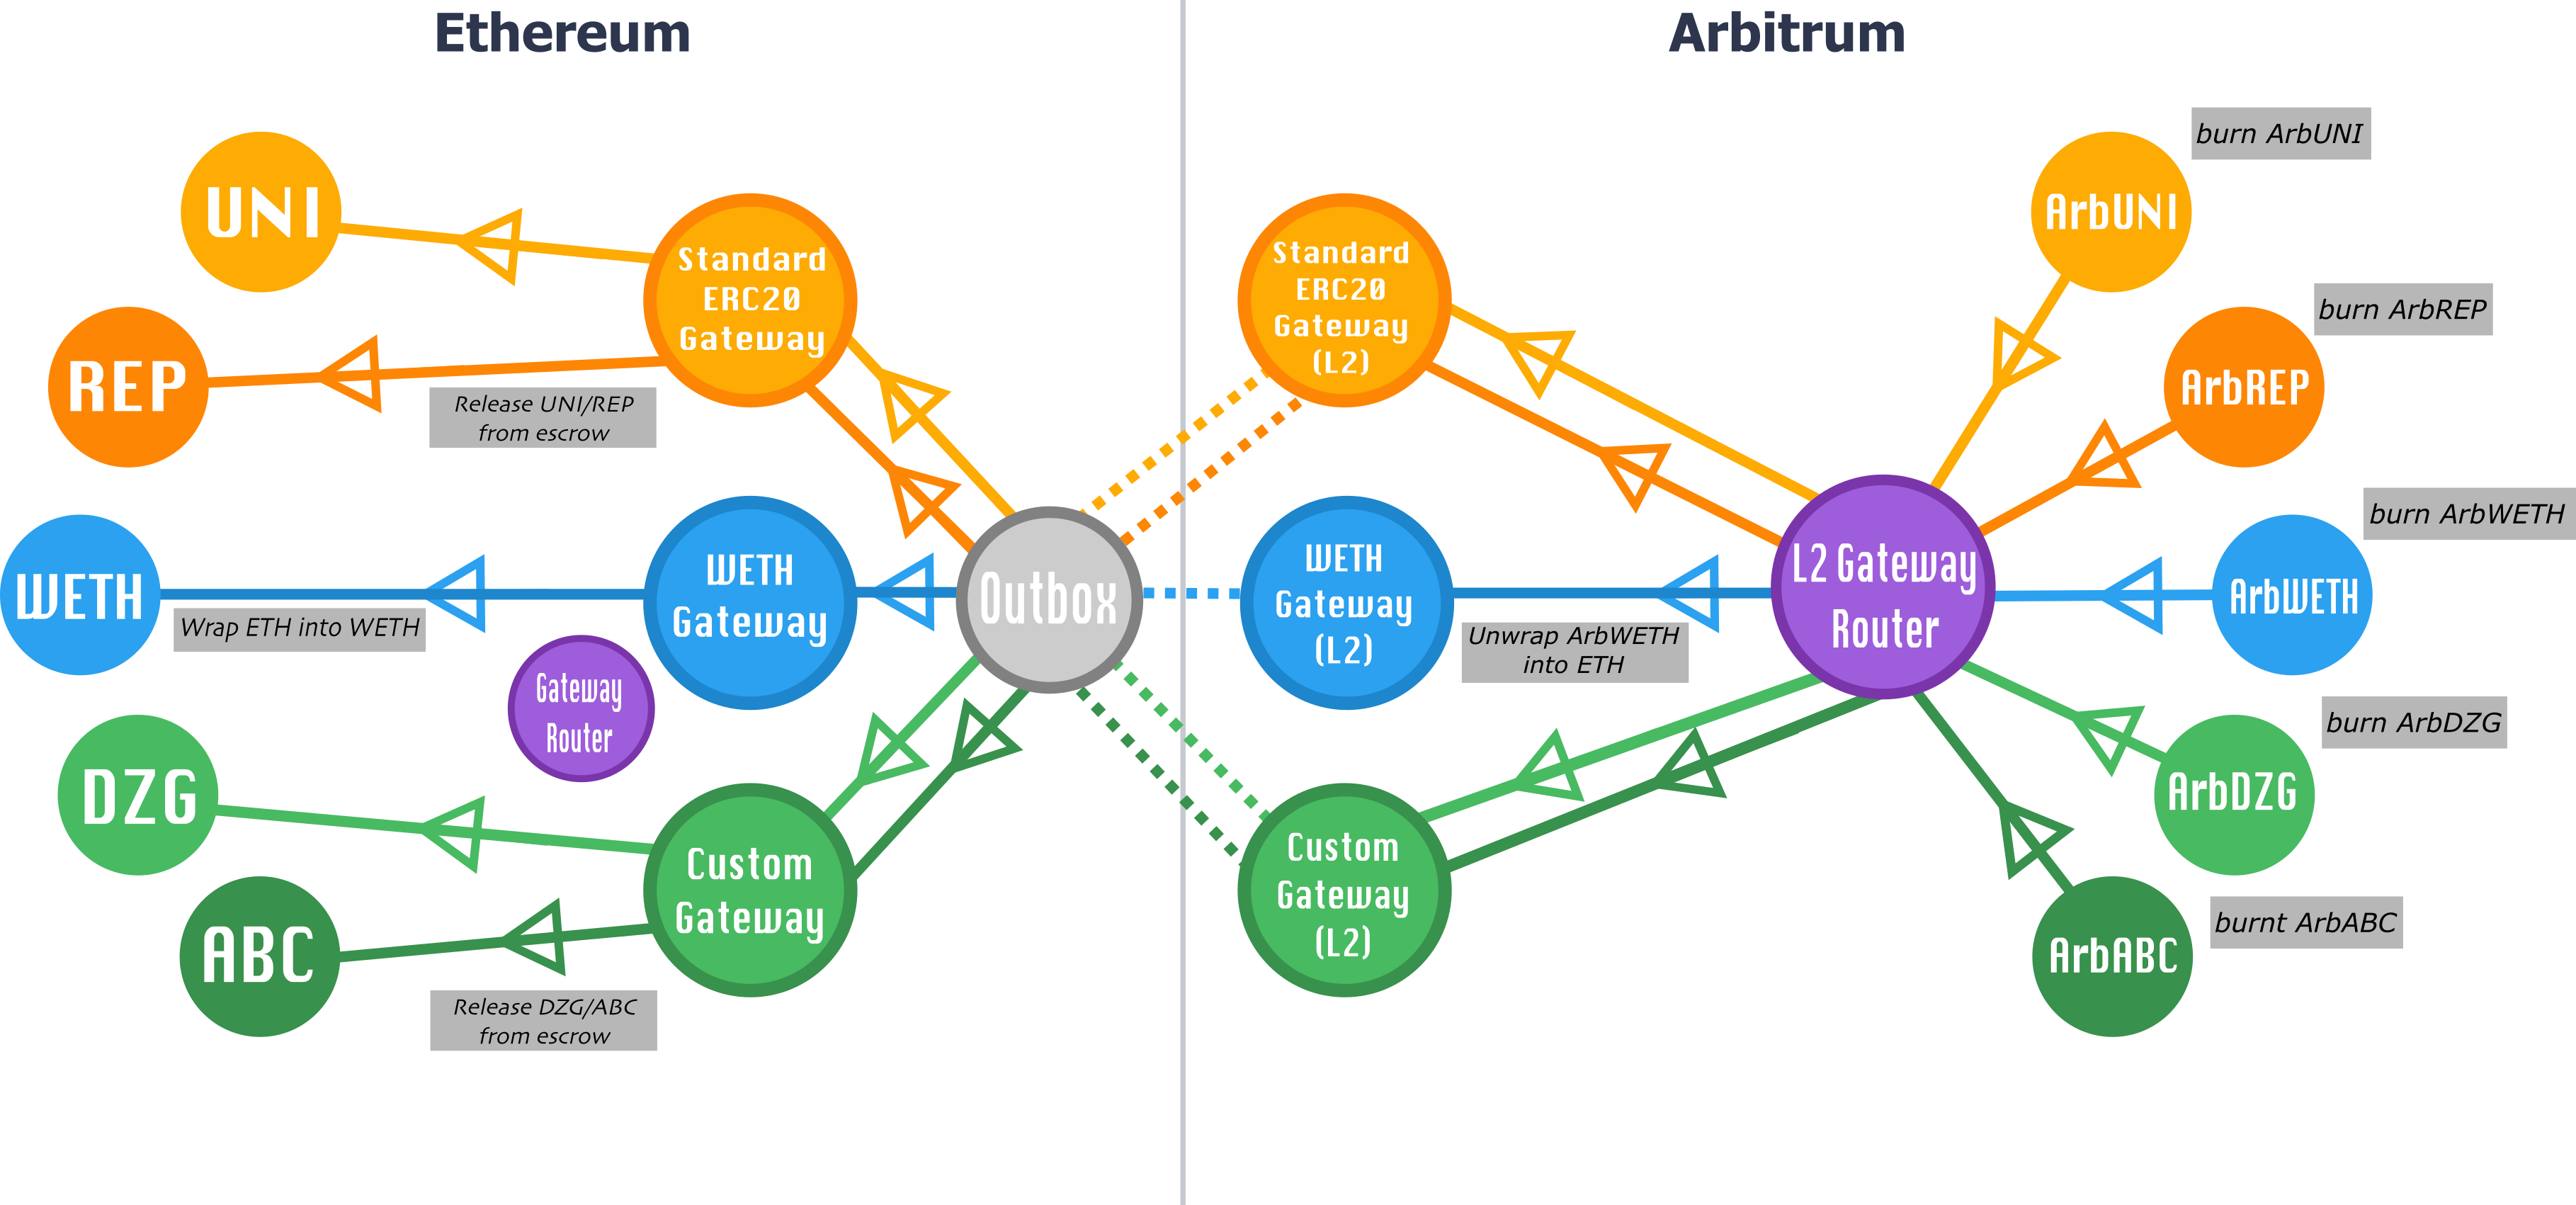
- Child chain: Tokens are burned (or escrowed for custom tokens)
- Message created: A child-to-parent message is encoded and included in an assertion
- Challenge period: Wait ~7 days for the assertion to be confirmed
- Parent chain: After confirmation, execute the message to release tokens from the parent gateway
For more details on the underlying protocol, see:
Troubleshooting
"Withdrawal not ready to execute"
The challenge period hasn't passed yet. Withdrawals take approximately 7 days (6.4 days on Arbitrum One) to finalize. Check the status using:
const status = await message.status(childProvider);
console.log(L2ToL1MessageStatus[status]); // Should show "CONFIRMED" when ready
"Message already executed"
This withdrawal has already been executed. Check the parent chain token balance - the tokens should already be there.
Finding batch number and index
If you need to manually construct the proof, you can find the batch number and index from the withdrawal transaction receipt events. Look for the L2ToL1Tx event emitted by ArbSys.
Next steps
- Deposit tokens to child chain
- Understand token bridge architecture
- General child-to-parent messaging